ERPNext 在 Ubuntu 24.04 LTS 中的安装笔记 Step by Step 文章目录 | Table of Contents ERPnext 简介 先决条件 安装步骤 总结 & 引用 先决条件 | Prerequisites 系统环境要求 Ubuntu 24.04 A user with sudo privileges Python 3.11+ pip 20+ MariaDB 10.3.x Node.js 18 Yarn 1.12+ 硬件要求 2 Process 2 Core 4GB ram 40GB Storage Intenet 安装步骤 | Installtion Steps 包升级和创建新用户 Update and Upgrade Packages sudo apt-get update -y && sudo apt-get upgrade -y Create a New user sudo adduser **Your-user-name** #Fill in the information as prompted sudo usemod -aG sudo **Your-user-name** su **Your-user-name** #Enter your password cd ~ 安装环境需要的包 sudo bench setup production **erp-user** 将 ERPNext 配置为生产模式。 该命令会: 配置 Gunicorn(用于处理 Python 请求的 WSGI 服务器)。 配置 Supervisor(用于管理后台进程)。 确保站点在生产环境中以最佳性能运行。 [**erp-user**] 是运行 Frappe/ERPNext 的系统用户(通常为 frappe)。 bench setup nginx 配置 Nginx 作为反向代理服务器。 Nginx 负责处理外部请求并将其转发给 Gunicorn。 该命令会自动生成 Nginx 配置文件并启用站点。 sudo supervisorctl restart all 重启所有由 Supervisor 管理的进程。 确保所有服务(如 Gunicorn、后台工作进程等)使用最新的配置。 sudo bench setup production **erp-user**(重复) 再次运行以确保所有生产配置已正确应用。 访问站点 在生产模式下,ERPNext 通过 Nginx 提供服务,默认使用 HTTP(80 端口)或 HTTPS(443 端口)。 你可以直接通过服务器的 IP 地址或域名访问站点,无需指定端口号(如 http://your-server-ip)。 总结 和 引用 | Conclusion & References References: How to Install ERPNext Version 15 on Ubuntu 24.04: A Step-by-Step Guide - https://syncbricks.com/how-to-install-erpnext-version-15-on-ubuntu-24-04-a-step-by-step-guide/ Youtube - Chat GPT & DeepSeek

March 5, 2025 0comments 50hotness 0likes Read all

故障现象 Proxmox 性能显示界面无数据,且时间为1970-01-01 解决方法 同步系统时间和硬件时间: 先确保系统时间和硬件时间是正确且同步的: # 设置正确的系统时间(例如:2025-01-13 10:00:00) date -s "2025-01-13 10:00:00" 1. 同步系统时间到硬件时钟 hwclock -w 1. 检查硬件时钟时间 hwclock 重启 PVE 服务: 修改时间后,重启相关服务以确保正常运行: systemctl restart pve-cluster systemctl restart pveproxy systemctl restart pvedaemon 清理 rrd 数据缓存(可选): 如果时间错乱严重,可能需要清理并重建 RRD 数据: systemctl stop pve-cluster rm -rf /var/lib/rrdcached/db/pve2-node/ rm -rf /var/lib/rrdcached/db/pve2-storage/ rm -rf /var/lib/rrdcached/db/pve2-vm/ systemctl start pve-cluster 验证 NTP 配置: 使用 NTP 服务确保系统时间自动同步: apt update apt install ntp systemctl enable ntp systemctl start ntp ntpq -p 如果不需要 NTP,可以手动设置时间,但建议保持系统和硬件时钟同步。 刷新 Web 界面: 重新登录 Proxmox 的 Web UI,查看内存图表是否恢复正常。

February 2, 2025 0comments 188hotness 0likes Read all

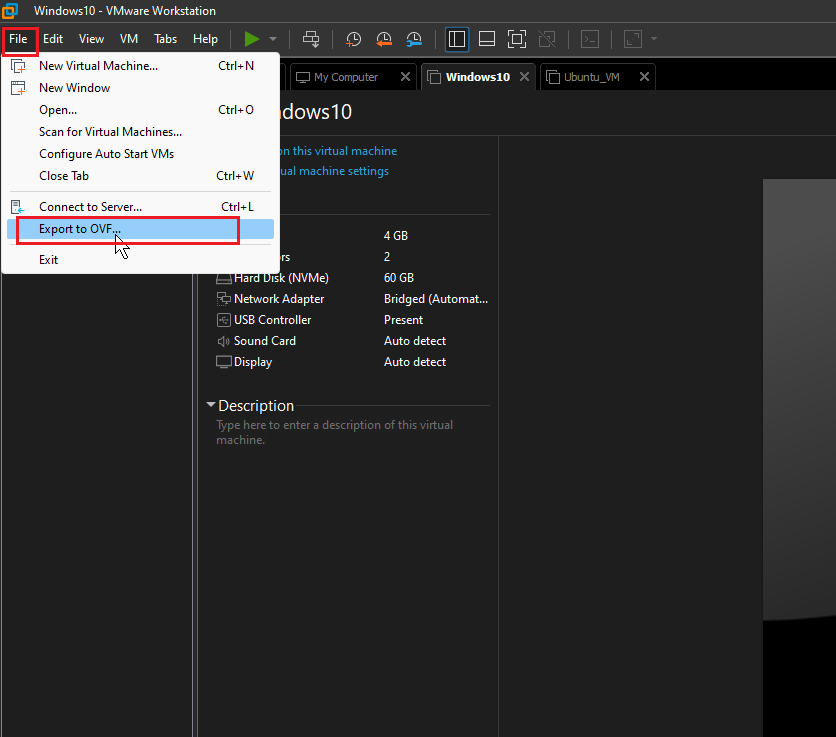
VMware Station 遷移到 Proxmox PVE 筆記 必要條件 VMware Station 中有VMS VMware Station宿主機和Proxmox 服務器有足夠的磁盤空間 一些基本的Linux命令知識 當前的軟件版本 VMware Station: VMware® Workstation 17 Pro 17.0.0 build-20800274 Proxmox : Proxmox Virtual Environment 8.3.0 操作步驟 從VMware Station 導出VMS ,文件為*.ovf 將VMware Station 導出的*.ovf 下載到Proxmox 節點中 執行導入命令 新增網絡設備,複製MAC地址 Step by Step 從VMware Station 導出VMS 點擊導出按鈕 導出文件到目錄 等待導出到目錄 通過Shell下載ovf 和vmdk文件 mf 在宿主服務器中建立HFS服務,將導出的ovf文件和vmdk文件添加到HFS服務中 在Proxmox 服務器中下載文件 wget http://10.253.253.100/Windwos10_wechat.ovf #依次將其下載到proxmox服務器中 Ubuntu ID: 100 Windows 10 導入到Proxmox root@pve:qm importovf <vmid> <manifest> <storage> [OPTIONS] #Create a new VM using parameters read from an OVF manifest #https://pve.proxmox.com/pve-docs/qm.1.html 參數說明: "vmid:" 虛擬機在PVE 中的ID,Proxmox 中初始第一台VM的ID 為100, 這個100就是VMID "manifest:" ovf格式文件,從VMware Station中導出的虛擬機文件 "storage:" PVE的存儲池, 例如 'local-lvm' "[OPTOPNS]:" ---format qcow2 | raw | vmdk Target format 詳細請參考: https://pve.proxmox.com/pve-docs/qm.1.html 示例: qm importovf 101 'Windows10_wechat.ovf' local-lvm --format vmdk 執行完該命令等待數據轉移,完成之後會自動回到命令執行界面,如下圖 轉換完成,在Proxmox 控制台中即可看到這台VM 添加新的網絡設備 注意: 記得將原來的MAC地址複製到新的網絡設備中 其它 如果是Windows操作系統,卡在 “booting from Hard Disk” 無法啟動,請先將VM停止, 再將BIOS 改成"UEFI"即可 檢查核對Proxmox 的時區、時間同步 基本的安全設置 總結 之前一直用的VMWare Station 和 ESXi,猶豫這次換了聯想Staiton S30 ,就開始使用Proxmox。在Windows上使用VMWare Station 和單獨的服務器使用 ESXi , 就算是上M2和 SSD 效率和啟動速度不如Proxmox;遠程虛擬主機(windows) 操作起來比VMWare 的流暢, 已經能滿足日常辦公使用了。 在易用性方面,ESXi 和 Sation 會比Proxmox 好一些(對於沒有Linux 基礎的人來說); Renfrence vmware-VM迁移至Proxmox VE教程https://foxi.buduanwang.vip/virtualization/375.html/ pve documenthttps://pve.proxmox.com/pve-docs/qm.1.html

January 13, 2025 0comments 55hotness 0likes Read all

Linux 真好用 与Windows 相比, Linux 的效率实在太好了。为了避免自己忘记用过的命令,避免手忙脚乱又到处去找,特意写一下笔记。最近在忙别的~ 11月好快,就要过完了,所以及时来水一篇。 Vim 配置 以下命令可以对齐VIM编辑器,会高亮输入光标 sudo echo set nu ts=2 et sw=2 cuc autoindent > ~/.vimrc 修改root 密码 sudo passwd root #之后根据提示输入2次密码即可 网络配置 #显示网卡 nmcli con show #修改网卡IP地址 nmcli con mod "Wire connection 1" ipv4.method manual ipv4.address 172.25.250.100/24 ipv4.gateway 172.25.250.254 ipv4.dns 172.25.250.250 autoconnect yes #禁用和启用网卡 nmcli con down "Wire connection 1" nmcli con up "Wire connection 1" #修改 允许root 访问 ssh sudo echo "PermitRootLogin yes" >> /etc/ssh/sshd_config.d/01-permitrootlogin sudo systemd restart sshd 进程管理 #查找名为qcloud 的进程 ps aux | grep qcloud #根据进程ID 强制杀死进程 kill -9 1588

November 22, 2024 0comments 158hotness 0likes Read all

Setting Up SMB Service on Ubuntu 18.04 Table of Contents Install SMB and enable the SMB server and restart it. Add an SMB user. Edit the SMB configuration file. Permission configuration: Read (R) Read/Write (RW) Firewall configuration. Visit the SMB server on your local network. Install SMB server sudo apt update sudo apt install samba sudo systemctl enable smbd sudo systemctl restart smbd Add an SMB user sudo smbpasswd -a username Edit the SMB configuration file sudo vim /etc/samb/smb.conf [WiKiFolder_for_Client] comment = Shared Folder path = /home/username/wiki browseable = yes valid users = @username [WiKiFolder_for_Client]: The name of the shared folder being defined. comment = Shared Folder: Description of the shared folder. path = /home/username/wiki: Specifies the path of the shared folder. browseable = yes: Allows the shared folder to be visible on the network. valid users = @username: Specifies that only users belonging to the username group can access the shared folder. [WiKiFolder_for_Client] comment = Shared Folder path = /home/ccdcam/wiki browseable = yes valid users = ccdcam writable = yes valid users = username: Specifies that only users belonging to the username group can access the shared folder. writable = yes: Allows users to write to the shared folder. Firewall configuration Allowed th 445/tcp sudo ufw allow 444/tcp Accessing the SMB Share on your local network For Windows: Enter \\<serverIPaddress> in the file explorer's address bar, then proceed to log in. Viewing the SMB User List Using the pdbedit Command: To list the users in Samba, enter the following command in the terminal: sudo pdbedit -L -v This will…

July 25, 2024 0comments 45hotness 0likes Read all

Flash OpenIPC firmware onto SigmaStar SSC335 SoC and Sony IMX307 IPC module. Requirements IPC module USB to TTL cable Windows laptop or computer Running a TFTP server on your Windows computer Results IPC module specifications Flash:GD25Q64CSIG: https://www.digikey.cn/zh/products/detail/gigadevice-semiconductor-hk-limited/GD25Q64CSIG/9484942 Soc:SigmaStar SSC335https://linux-chenxing.org/infinity6/ssc335_pb_v03.pdf Sensor: 1/2.8" 2MP CMOS Sony IMX307 LAN Windows computer TFTP SERVER directory structure The "bin" directory serves as the current directory for the TFTP server, used to store firmware files. Disable the firewall on the Windows computer and run tftp64.exe. Step 1: Welding the UART interface. Here is the TTL connection. Step 2: Connect the IPC module to your Windows computer using a USB to TTL cable. Connect the IPC module to your computer using a USB to TTL cable. Open PuTTY. Configure the serial port information. Restart the IPC module. In the PuTTY window, continuously press the "Enter" key on the keyboard. Step 3: Enter the following command in the PuTTY window # Enter commands line by line! Do not copy and paste multiple lines at once! setenv ipaddr 192.168.8.200; setenv serverip 192.168.8.250 mw.b 0x21000000 0xff 0x800000 tftpboot 0x21000000 openipc-ssc335-lite-8mb.bin #如果上面的命令执行不成功,请执行下面的。sf lock 0; 会提示失败, 不过没关系,继续下面的 1. if there is no tftpboot but tftp then run this instead tftp 0x21000000 openipc-ssc335-lite-8mb.bin sf probe 0; sf lock 0; sf erase 0x0 0x800000; sf write 0x21000000 0x0 0x800000 reset Note If you cannot input in serial port mode, please close the serial port first. Before re-entering, turn off flow control.

July 18, 2024 0comments 60hotness 0likes Read all

In this article, I will share with you about my second time installing CUPS on Ubuntu. Requriement Ubuntu 18.04 LTS Install on an Old Computer Canon E410 Series Printer Internet CUPS Installation and Configuration Step by Step Install CUPS on your system #install cups sudo apt-get install cups cups-pdf cups-bsd Back up the configuration file #copy configuration file sudo cp /etc/cups/cupsd.conf cupsd.conf.bak Editing the CUPS configuration file #add user simith to lpadmin group sudo usermod -aG lpadmin simith #edit cupsd.conf sudo vim cupsd.conf Edited cupsd.conf contents.(Configuration options not mentioned should be left as default.) #allow access port Port 63100 LogLevel warn PageLogFormat MaxLogSize 200 1. Show shared printers on the local network. Browsing on BrowseLocalProtocols dnssd 1. Web interface setting... WebInterface Yes 1. Restrict access to the server... <Location /> Order Allow,deny Allow @LOCAL Allow From 127.0.0.1 Allow From 192.168.0.0/16 </Location> 1. Restrict access to the admin pages... <Location /admin> #access user simith can visit admin page Require user simith Order Allow,deny Allow @LOCAL Allow 127.0.0.1 Allow From 192.168.0.0/16 </Location> 1. Restrict access to configuration files... <Location /admin/conf> AuthType Default Require user simith Order allow,deny Allow @LOCAL Allow 127.0.0.1 Allow From 192.168.0.0/16 </Location> 1. Restrict access to log files... <Location /admin/log> AuthType Default Require user simith Order allow,deny Allow @LOCAL Allow 192.168.0.0/16 </Location> Restart CUPS service and add to starup sudo systemctl restart cups sudp systemctl enable cups End Finally, you can visit the Ubuntu IP address and configuration Example: " http:// ubuntu ip address:63100 " Another article 打印服务器cups安装笔记https://www.itiohub.com/log/413.html

June 16, 2024 0comments 29hotness 0likes Read all

因为Frp client 之前是使用批处理启动的,所以每次电脑重启之后,需要等到登录之后才能启动。目的是要操作系统启动之后就直接启动Frp client。为了解决这个问题,所以使用nssm来将Frp client安装到windows的服务,使它作为服务启动。这样就可以实现当电脑启动之后就可以直接启动。 目录 先决条件 安装过程 验证和引用 先决条件 Frp 服务端 与客户端https://github.com/fatedier/frp nssm 程序https://nssm.cc/download 根据Frp服务端的信息配置好相对应的Frp客户端信息 安装过程 Step 1 在Windows操作系统下配置好Frp 的客户端信息之后,使用命令行进入nssm目录,如下图:注:请根据你的实际情况,进入相对应的目录; Step 2 通过命令行 安装服务 nssm install MyFirstService #### Step 3当你在命令行中输入step2的命令,系统会跳出nssm 的gui让你填写程序的相关信息。这个时候,你只要在Nssm gui中填入服务的相关信息即可。如下图所示: 程序路径 程序工作目录 额外参数然后顶部的"Details"就是服务的相关详细描述和设置了。这个大家可以自己去尝试。在填完1-3步骤中的信息之后, 服务就算安装完成了。 (记得使用管理模式运行nssm) 验证和应用 在windows 的命令行输入“services.msc” 打开windows 的服务管理窗口 通过上图就可以判断 服务已经添加成功。 另外你还可以在frp 根目录下查看frp运行的日志。 引用 Frp 服务端 与客户端https://github.com/fatedier/frp nssm 程序https://nssm.cc/download 这就是使用nssm 在windows下,快速的创建服务的简单使用笔记。

June 2, 2024 0comments 44hotness 0likes Read all

使用iKuai的Docker 安装Uptime 监控网络状况并设置通知提醒 Uptime Kuma 简介 我爱开源 Uptime Kuma 是一个开源项目,它的项目地址是在这里https://github.com/louislam 开发者是以为香港Coder, 该项目已经有了43.4k star. 大家再给他多一些星星吧! 缘由 有时候有些服务器因为某些原因离线了,忘记检查了。 然后造成服务器无法正常服务。于是就有了想法在iKuai的 Docker 中安装Uptime 来监控服务器和网络设备的在线状态 先决条件 路由器要有空闲磁盘来存储Docker数据, 不然无法正常安装Docker插件 iKuai 版本要在3.5以上 在iKuai云平台绑定设备,并安装好Docker插件 安装步骤 在路由器的USB口插入一张USB磁盘并在"系统设置" - " 磁盘管理- 磁盘分区中" 将磁盘分区并挂载 绑定业务选择" 普通存储" 即可 在云平台的" 插件应用 " 插件市场中选择要安装docker的设备 在云平台 "插件管理" 检查插件安装状态, 显示安装成功则可以进行下一步操作 回到路由器中的"高级应用" - "插件管理" 点击蓝色的 "docker" (需要在云平台安装好docker插件成功才能看到) - " 服务设置 " 将镜像库URL 设置为微软的https://mcr.microsoft.com/ 点击确认保存 回到Docker 界面 点击 "镜像管理" 点击添加, 选择"镜像库下载" 在搜索框中输入Uptime 选择: louislam/uptime-kuma 下载, 然后等待提示下载成功下载时间取决于您的网络状况和磁盘速度 回到Docker 界面 点击 "接口管理" 添加新的接口 如下图:(可以根据您的自身需求设置,但是不可以与路由器本身的LAN地址冲突) 回到Docker 界面, 点击"容器列表" 添加新的容器如下图 添加完容器之后启动即可 容器端口映射 端口映射只要将容器的3001端口映射出去就可以使用外网地址访问了 参考: https://www.ikuai8.com/zhic/ymgn/lyym/2019-12-13-06-35-05/2021-03-08-07-27-41.html 基本使用 Uptime Kuma 自带多国语言 配置简单 使用方便 , 大大减低了运维人员的学习成本. 总的来说, uptime的基本使用分为4部分 创建管理员账号 添加需要监控的设备或者服务 创建状态页面给非运维人员查看 若有需求,可以设置通知渠道进行提醒 更高级的API功能就大家自己去研究啦 基本使用如图所示 通知提醒设置 请参考设置页面中的链接, 有具体文档, 其中本人是使用的Telegram Bot , 因为Telegram Bot 是最简单,最方便的. 最后感谢 感谢张品正同学的分享, 感谢iKuai的产品. 是因为他们我才想到把它部署到iKuai并完成我的需求.

December 29, 2023 0comments 26hotness 0likes Read all

公有云安装Panabit 专业版 笔记 Release date: Dec 22,2022 Th . Panabit Version: R0.00[TANG(大唐)r3],Build date 20221031.132102 [Linux 3.10]Author: Duke Hsu 此笔记记录了使用单网卡轻量云服务器安装panabit的过程。 准备工作 云服务器 操作系统: Centos 7.6 x64配置: 2C 8G 1 eth Panabit 材料 Panabit一键上传 云服务器工具(包含安装和解压 GUI.exe)Panabit专业版Linux安装包(LPanabitOEM_WUDAIr1_20201125_Linux3.tar.gz)云服务器的IP地址和密码云服务器需要开启SSH 端口和服务 安装步骤 云服务器初始化 关闭防火墙 #停止防火墙 systemctl stop firewalld #关闭开机自启动 systemctl disable firewalld 检查网卡配置 #打印IP地址信息 ifconfig #查看网卡详细信息(ifcfg-eth0为网卡名,有些不一样,视情况而定) cat /etc/sysconfig/network-scripts/ifcfg-eth0 记录下来IP地址信息以备稍后做Panabit配置使用 Panabit安装 使用GUI.exe 工具根据提示 将安装包上传到云服务器 全自动安装 重启服务器之后即可使用web登入Panabit进行管理 如果无法访问请检查管理口名称是否与云服务器网卡名不一致 如果提示安全问题,请使用低版本的chrome浏览器访问,比如360急速浏览器 Panabit 配置 网络接口配置 在将eth接口方向更改为接外 在应用路由-接口线路-WAN线路 添加一个接口 如下图 请注意 WAN线路的IP地址是填写云服务器的内网地址 需要克隆mac地址 使用ping来验证配置是否正确有效 SD-WAN配置 在panabit中 他们把整合进panabit的sd-wan功能称为 iWAN服务,win客户端基于gretunnel协议(wintun.dll)进行与服务端通信(若有误请删除) Panabit 的SD-WAN服务端配置 用户认证-账号管理-组织构架创建组织构架> 添加用户组 >为用户组设置地址池 用户认证-账号管理-组织构架-本地账号添加用户账号-设定用户组-其它信息 应用路由-iWAN服务-服务列表 新增一个iWAN服务-设置服务名称和网关(服务网关和地址池不能与其他内网冲突) 应用路由-iWAN服务-服务映射 将你设置好的服务名称。设置好你需要的服务端口,然后点击添加即可 请注意 需要在云服务防火墙中配置允许改端口访问权限 UDP&TCP 应用路由-策略路由-IPv4路由 添加一个策略将iWAN的服务网关转发到WAN(如果你有多条线路可以设置你想要的线路) 跟着以上步骤,Pnabait的SD-WAN服务端就配置完成了。在客户端,Pnabit提供了多平台,多方式的连接方案 Linux客户端 Windows客户端 Panabit所有版本 都有提供iWAN接口的选项 SD-WAN客户端连接 Panabit设备 应用路由-接口线路-WAN线路 新增一条iWAN类型的外网线路 ,设置好服务端地址和端口以及MTU ,账号密码,连通之后你可以使用ping来验证是否工作。 请注意 如果无法连接 请检查服务端地址池配置是否有冲突 账号密码是否不正确 云服务防火墙是否已经配置并允许服务端口 无法上网请检查应用路由中的策略路由是否配置了转发 至此,在公有云中安装Panabit并配置SD-WAN的笔记就完成了。我使用一张网卡配置完成SD-WAN 比官方说明的需求的3-4张网卡成本更低。当然目前业务量小,还没出现问题。不知道到当业务量大了之后会不会出现其它问题。

December 22, 2022 1comments 54hotness 0likes Read all
12