
將docker 中的SQL database 遷移到ms Azure
## Scenario - Source Database running on Docker (Linux Server) - Traget Database running on Azure Server ## Prerequisites - 源database 的結構和目標da
Deploy MkDocs to GitHub Pages (github.io)
## 1) Setup MkDocs environment ```shell ## Create MkDocs virtual environment python3 -m venv mkdoc_venv ## Activate venv source mkdoc_venv/bi
ERP Next 搬家 - 从腾讯云迁移到PVE
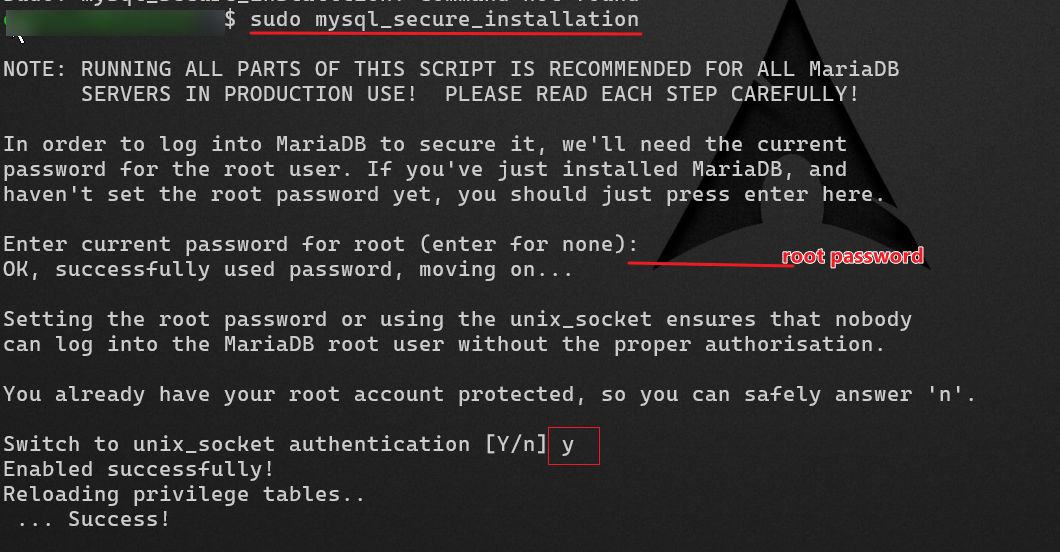
2025-12-31 21:08 Tags: ERP Next , Tencent Cloud --- ### Prerequisites - 轻量云创建镜像 , 并共享 - 通过轻量云创建的镜像,创建一个云服务器实例 - 在该镜像下创建的云服务器再制作一个镜像 - 创建一
Cups 維護筆記
--- ## Fixing CUPS Print Server Issue on Ubuntu 24.04 **Date:** 2025-11-30 12:42 **Tags:** #Linux #cups #printserver --- ## **Table of Co
Using Python and Streamlit with MS SQL
## Table of Contents 1. Create and activate the Python environment 2. Install Python modules 3. Install MS SQL 4. Start coding & Run --- #
Git and Github 筆記
## Git and Github 筆記 ### Git fast version control - 一些基本概念 - 版本管理和跟蹤 - 版本控制系統是軟件工具 - 可以幫助團隊管理源代碼 #### Status of Version 版本狀態 - Un
Install Jupyter notebook on Ubuntu 24.04 and allow remote access.
**References:** **Vultr** How to Install Jupyter Notebook on Ubuntu 24.04 https://docs.vultr.com/how-to-install-jupyter-notebook-on-ubuntu-24
Ubuntu Server 笔记
这篇笔记记录了日常使用ubuntu时需要设置的笔记 ### systemd-networkd-wait-online.service `systemd-networkd-wait-online.service` 是 Systemd 的一个服务单元,主要用于在系统启动时等待网络连接就绪。以下
ikuai安裝腳本
## 在vps中安裝ikuai的操作步驟如下 ## 命令操作部分 ### 查看當前vps的ip地址和網關地址 ```shell ip router ------- root@VM-0-14-ubuntu:~# ip route default via 10.0.0.1

Windows10桌面图标选择框变宽的处理办法
### 起源 * 因显示器是4K 的, 所以将“Make text bigger” 的值调到了150% * 如图所示 [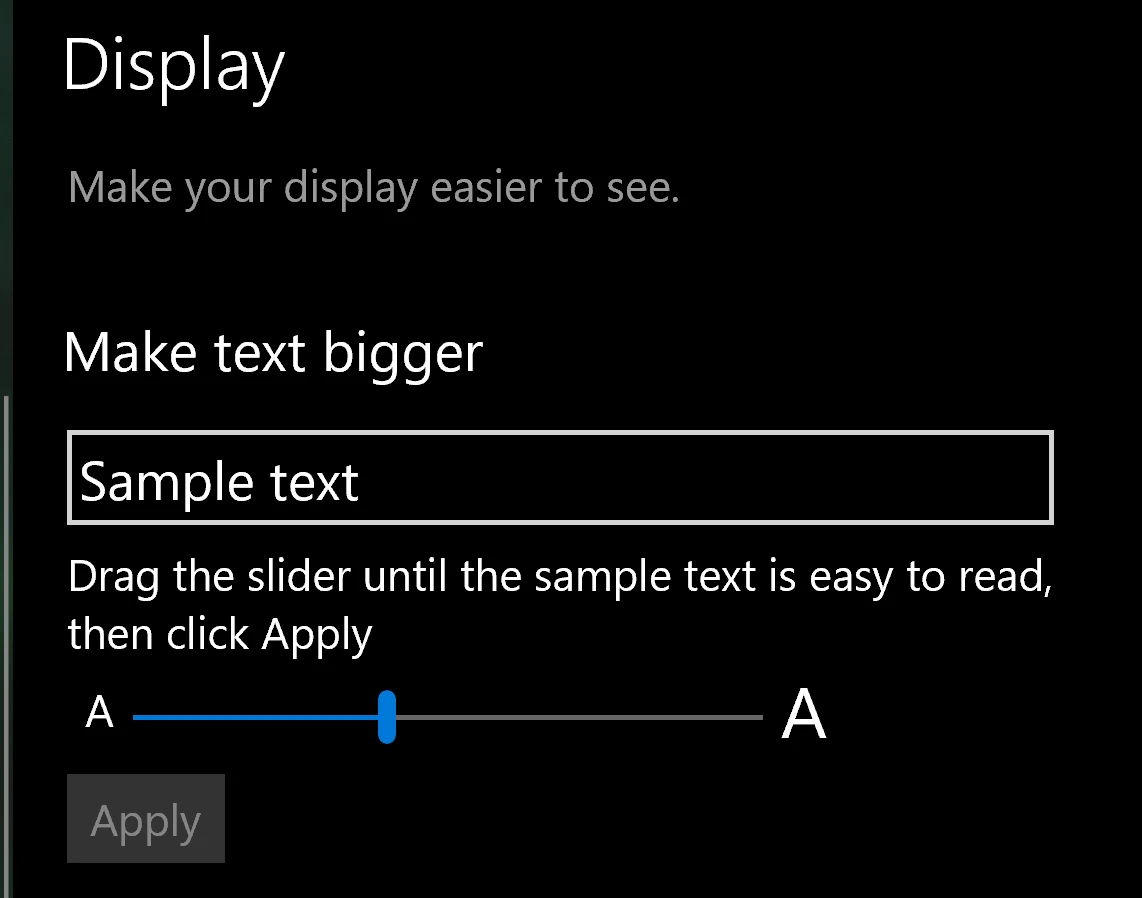{.

Pangolin 安装和使用示范
## Pangolin 安装和使用示范 ## 前提条件 为了跟随视频中的操作和配置教学,以下条件是可选的。 视频内容: https://www.bilibili.com/video/BV1cAJHz8EAj/ - 一台有独立公网IP地址的云服务器 - 一个域名 -
Typecho 迁移到 WordPress 笔记
## 准备工作 1. Typecho 数据导出插件 `Byetyp` https://github.com/sunxiyuan/ByeTyp 2. 打包备份Typecho中`/usr/uploads` 的数据 3. 备份统计代码和ADsense 代码 ## 步骤
Wireguard安装笔记
04/04/2025 15:01文章目录先决条件WireGuard 安装(Wg-easy)docker 常用命令VPS安装Wireguard的先决条件带公网IP地址的设备 / IPV6 也可以 (该笔记使用的Ubuntu18.04 操作系统的VPS 作为例子)VPS 启用SSHVPS安装Docke
在 Ubuntu 24.04 LTS 中的安装ERPNext 笔记 Step by Step
ERPNext 在 Ubuntu 24.04 LTS 中的安装笔记 Step by Step文章目录 | Table of ContentsERPnext 简介先决条件安装步骤总结 & 引用先决条件 | Prerequisites系统环境要求Ubuntu 24.04A user with sudo
Proxmox 内存图表等性能监控无数据显示的解决办法
故障现象Proxmox 性能显示界面无数据,且时间为1970-01-01解决方法同步系统时间和硬件时间: 先确保系统时间和硬件时间是正确且同步的:# 设置正确的系统时间(例如:2025-01-13 10:00:00) date -s "2025-01-13 10:00:00"
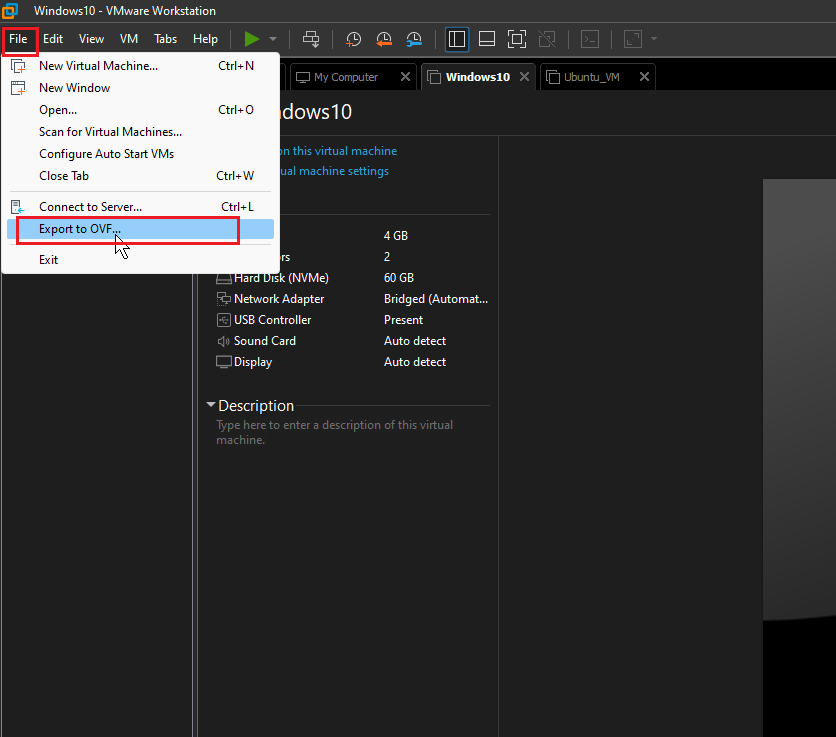
VMware Station 遷移到 Proxmox PVE 筆記
VMware Station 遷移到 Proxmox PVE 筆記必要條件VMware Station 中有VMSVMware Station宿主機和Proxmox 服務器有足夠的磁盤空間一些基本的Linux命令知識當前的軟件版本VMware Station: VMware® Workstation
Wordpress ERR_TOO_MANY_REDIRECTS 解决办法
故障现象在登录WordPress 后台时 浏览器显示 “ERR_TOO_MANY_REDIRECTS” 导致无法正常登录后台解决思路和步骤检查Cloud Flare HTTPS 配置 - - OK检查WEB 服务器中HTTPS 配置 - - OK检查Wordpress 数据库中的 si
Linux 常用命令笔记
Linux 真好用与Windows 相比, Linux 的效率实在太好了。为了避免自己忘记用过的命令,避免手忙脚乱又到处去找,特意写一下笔记。最近在忙别的~ 11月好快,就要过完了,所以及时来水一篇。Vim 配置以下命令可以对齐VIM编辑器,会高亮输入光标sudo echo set nu ts=2
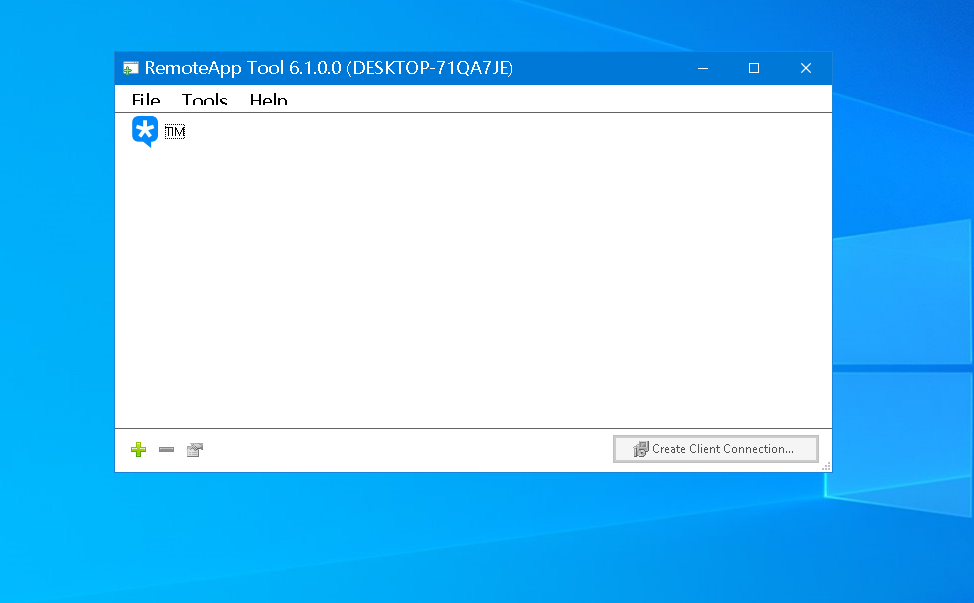
在本地PC使用遠程PC的軟件
在本地PC使用遠程PC的軟件起因是因為在日常工作的時候,有一個需求是要用到遠程計算機中的某一個應用程序。正常的操作是通過RD(remote desktop )來遠程目的PC,再進行操作。這樣對我來說有點麻煩, 我想直接在我本地的PC直接執行遠程PC的應用程序。於是就找到了“RemoteApp Too
Deep Live cam 笔记
Deep Live cam 笔记项目地址: https://github.com/hacksider/Deep-Live-Cam在本篇笔记中不会涉及cuda,Python,Conda,Git,等相关的计算机知识。只有步骤记录和在使用部署时遇到的问题记录。以下操作都是在Windows操作系统下进行的,

Markdown 语法知识
Markdown 语法知识Markdown 标题使用# 的数量来标识标题的等级/# 一级标题/## 二级标题 以此类推Markdown 段落段落没有特殊的格式,一般直接回车就是一个段落。但是你可以在句子末尾后面留2格空格即可 是的吧Markdown 分割线*** * * * ***** -
离线安装MicroSoft APP Store 中的应用
离线安装MicroSoft APP Store 中的应用先决条件操作系统版本在Windows10 或者以上能正常访问互联网PowerShell步骤概要在MircroSoft APP Store 获取应用APP 连接下载APP应用在PowerShell中添加应用操作步骤打开Microsoft St
Setting Up SMB Service on Ubuntu 18.04
Setting Up SMB Service on Ubuntu 18.04Table of ContentsInstall SMB and enable the SMB server and restart it.Add an SMB user.Edit the SMB configuratio
Flash OpenIPC firmware onto SigmaStar SSC335 SoC and Sony IMX307 IPC module.
Flash OpenIPC firmware onto SigmaStar SSC335 SoC and Sony IMX307 IPC module.RequirementsIPC moduleUSB to TTL cableWindows laptop or computerRunning a
Share an Old Printer on Your Local Network - CUPS
In this article, I will share with you about my second time installing CUPS on Ubuntu.RequriementUbuntu 18.04 LTS Install on an Old ComputerCanon E410